Architecture & Agility: 01 - UseCases
Using Protocols with Attributed Types and Nested Enums to implement Robert C. Martin’s UseCases
In this article I want to show you how I use the combination of protocols with attributed types to build expressive yet most simplistic modules which will offer their own flexible and safe DSL (Domain Specific Language) constructed by nesting enums with associating model objects as values where needed.
Why? What is the benefit?
The UseCases I will demonstrate here are part of an architecture that I call Core|UI for Swift. Though the principle design could be adopted in any language.
The goal of this architecture is to be reasonable, meaning that at anytime you can deduct its state and logic.
It also offers sustainable development speed, meaning that during the lifetime of an app project the development speed should not decay, like we see with so many of our projects.
This reasonability will also increase our projects agility.
Agility is the ability to react to changes fast. And especially in times of crisis this is crucial for any business, as in such times our products and services are put to the test. And if they don’t adapt to changes induced by the crisis, and we fail to improve them, somebody else will.
Technical overview
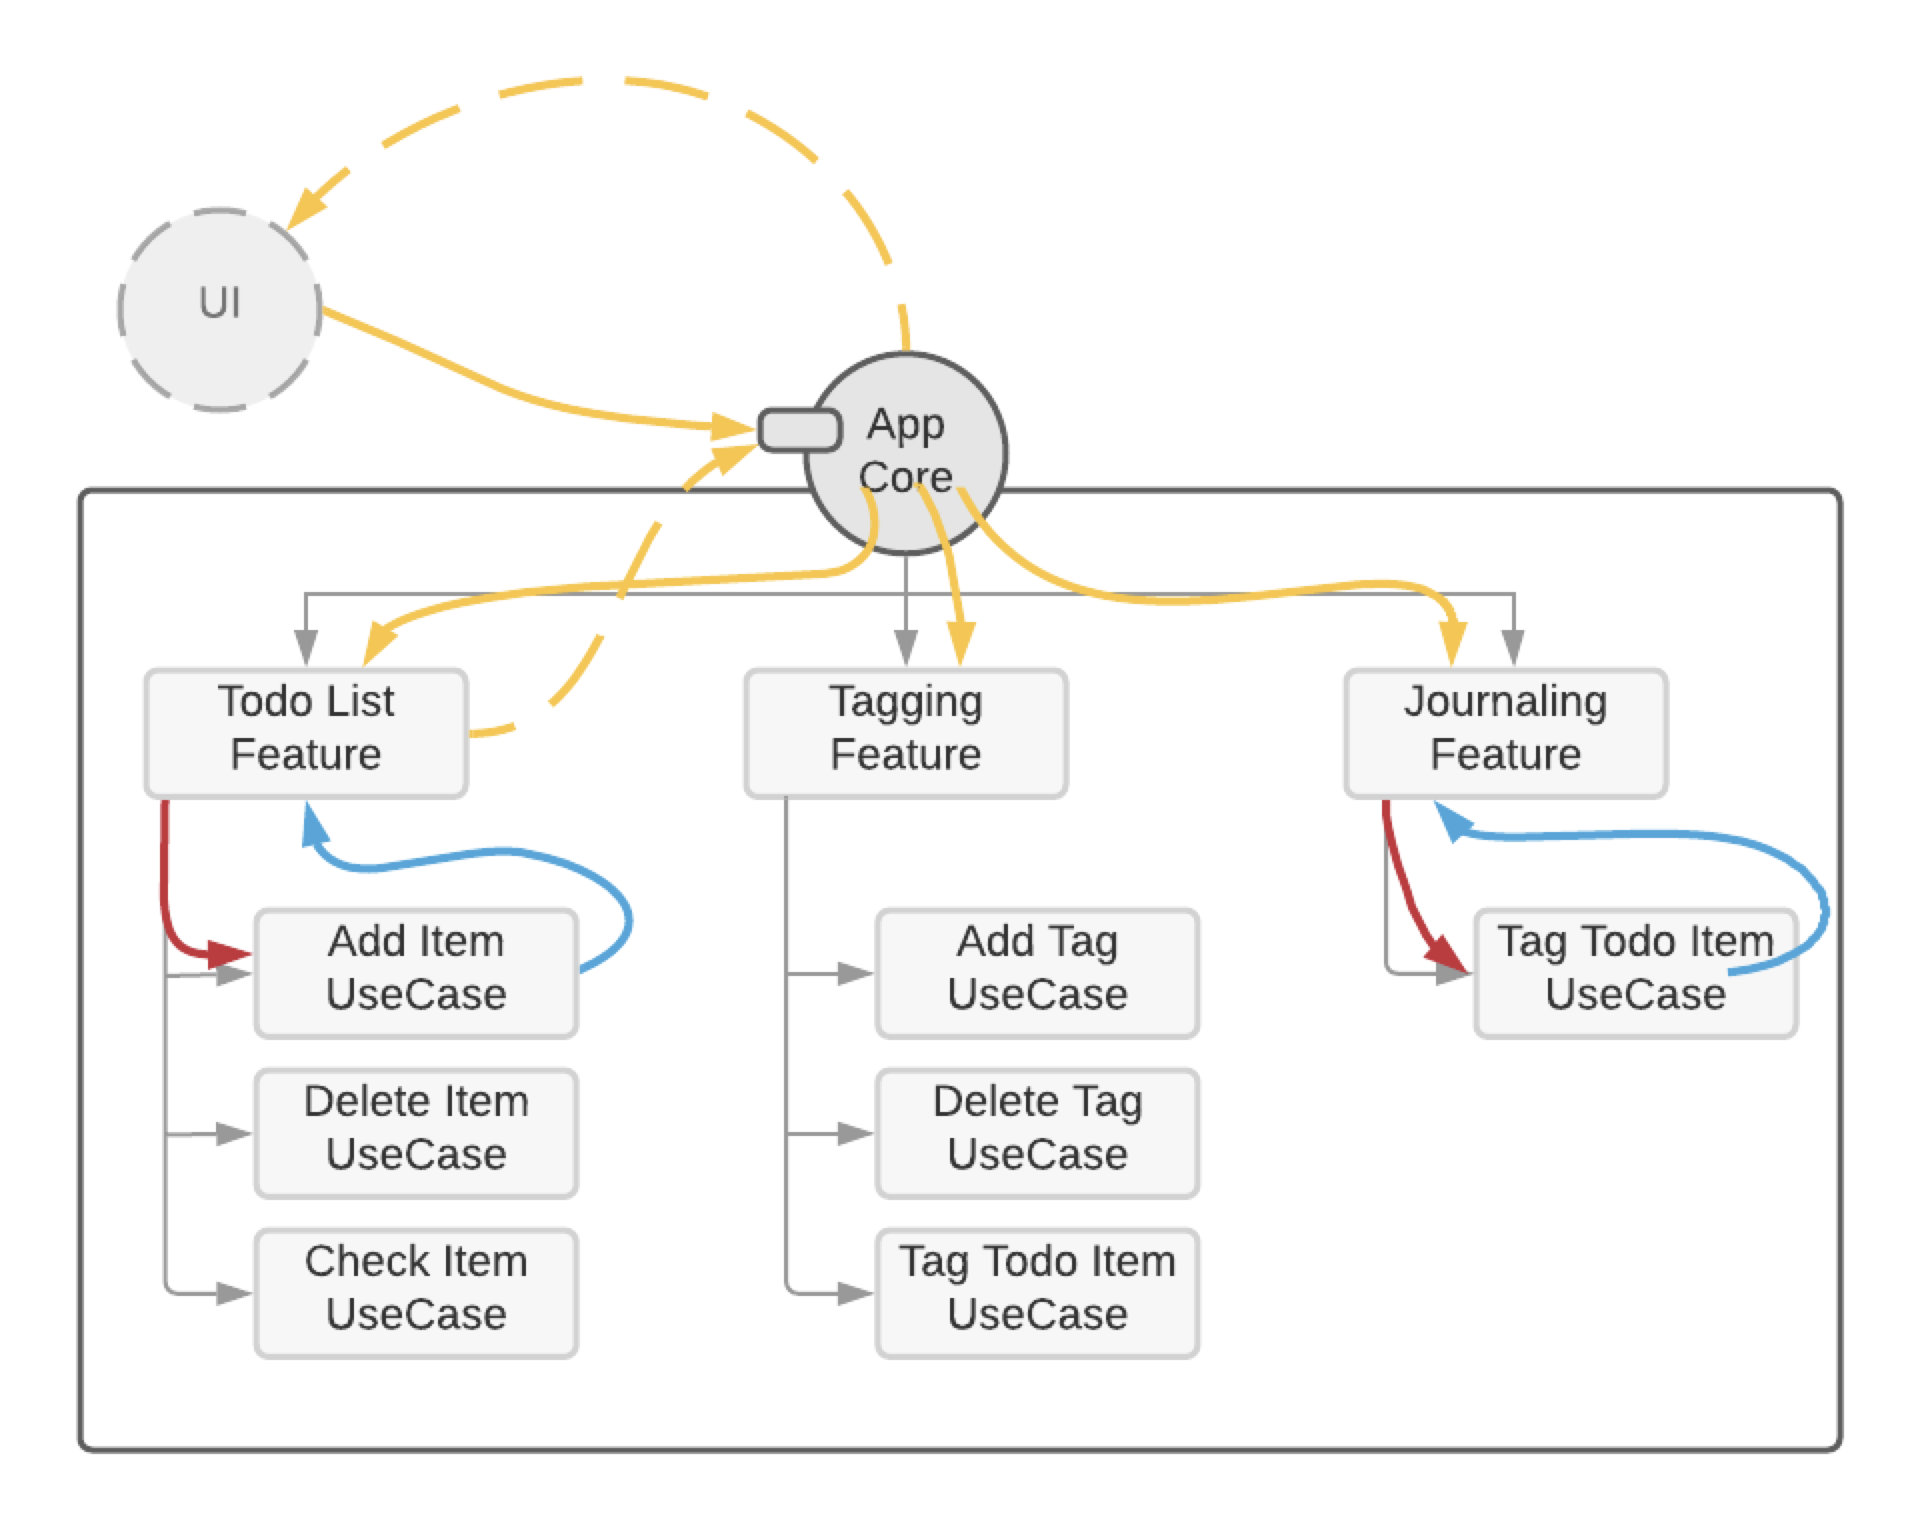
In Core|UI everything is a module and UseCases are the modules in with our app logic resides. I have taken them from Robert C. Martin’s Clean Architecture, but in fact — as Martin points out himself — this architecture is one flavour of the same idea which pops up over and over again — simply because it a solid idea.
Like in Martin’s UseCase, we use requests and responses for the UseCases to communicate with the rest of the app. But where Martin shows in his presentations that requests and responses go through boundaries, I will simply use the terms in- and output. Also, in most of his materials Martin indicates that behind those boundaries are controller & presenter, in Core|UI I do it a bit different as my architecture actually uses a simple messaging bus.
Every UseCase has its own request and response types. These types could be anything, but I use nested enums with associated types for each of those, simply because this results in a powerful message DSL.
UseCases are grouped into Features. Where a UseCase has its own pair of nested enums, Features share one enum, as it is a features sole task to receive messages from other features and invoke UseCases in accordance to the received message.
All features together form the Core, which only has an input to receive message from the UI and other sources (think push notifications) but no output. As the UI sends and receives messages it is conceptional just another feature, I do treat it specially and as an alien, as this gives us the ability to load the core with another interface — may it be another platform, another UI framework (you can use the same core in your new SwiftUI app but also in the legacy UIKit app) or mocked interfaces during testing as this allows for easy Unit Tests and BDD specs.
If you map out the relationship of Core, Features, and UseCases you will get a tree structure, with the core as root and the UseCases as leafs. All communication in the Core (messages, requests, responses) is unidirectional. Which is also an important characteristic for a reasonable architecture.
Another way of describing Core|UI would be to say:
Core|UI resembles a modularised Command Interpreter using — at least for this article series — an immutable state store. Neither immutability nor a central store are a necessity, but I found this approach quite fun and teaching to implement, and I thought you might value it, too.
A synonym for reasonable could be sustainable, at this is what we are really after: As I will show in a later article, Core|UI allows for a fast development speed. But where in most system the dev speed drops over time, as the code transforms slower or faster into what most people refer to as “Spaghetti Code” and I recently started to call “Barb Wire Code”, Core|UI helps you by staying on track.
The UseCase
This first article will focus on the UseCase and its interface via DSL.
DSL stands for Domain Specific Language and describes a language specialised with regards to a particular application domain. Often it is associated with extra designed programming languages, but I can’t see why I shouldn’t use that term on a nested and associated enums, as it can result it very expressive and flexible messages.
Most UseCase DSLs are rather simple:
    enum Request  {
        case add (item: TodoItem)
    }
    enum Response {
        case wasAdded(item: TodoItem)
        case wasNotAdded(item: TodoItem, ToDoListError)
    }
UseCases should only do one thing, like adding items. There-for the request often has one command. And the response will often have two cases: one success and one failure case. But this neither a law nor a rule. i.e you might want to combine symmetric commands in one UseCase, such as opening and closing files.
But as I mentioned before: In my architecture pretty much everything is a module and has its own DSL. Those might be more complex.
But let’s look at a UseCase itself:
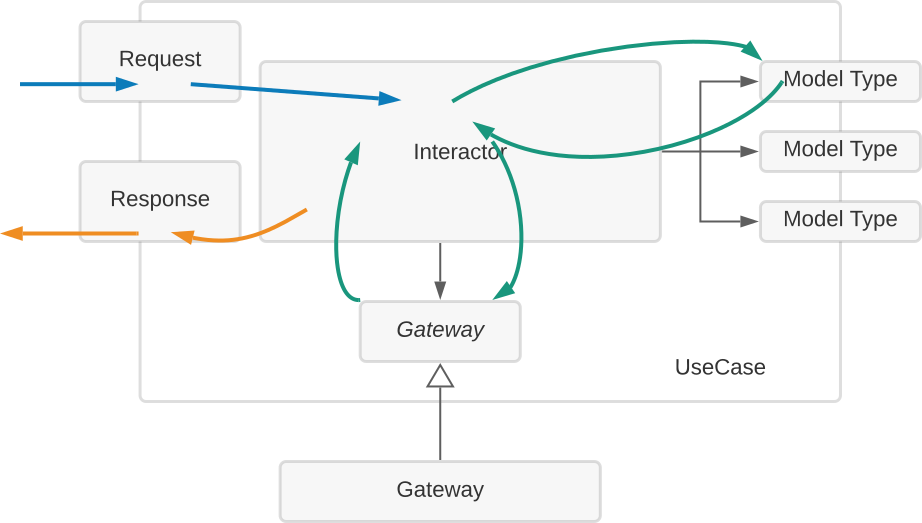
A common UseCase takes a request, processes that in its Interactor and returns a response. It may talk to the outside world (network, disk, db, …) via gateways, which will be passed in during the instantiation of the UseCase.
In swift a UseCase may be defined as:
protocol UseCase {
    associatedtype RequestType
    associatedtype ResponseType

//  init(..., output: @escaping (_ response: ResponseType) -> ())
    func request(_ request: RequestType)
}
This is a “PAT” — a Protocol with associated types. To implement a concrete UseCase type, we need to declare what types are our request and response types
struct AddTodoItemUseCase: UseCase {
    enum Request  {
        case add (item: TodoItem)
    }
    enum Response {
        case wasAdded(item: TodoItem)
    }
    typealias RequestType = Request
    typealias ResponseType = Response

    init(store: StateStore, responder: @escaping ((Response) -> ())) {
        self.interactor = Interactor(store: store, responder: responder)
    }

    func request(_ request: Request) {
        switch request {
        case .add(item: let item):
            interactor.add(item: item)
        }
    }
    private let interactor: AddTodoItemUseCase.Interactor
}

fileprivate extension AddTodoItemUseCase {
    final class Interactor {

        init(store: StateStore, responder: @escaping ((Response) -> ())) {
            self.store = store
            self.respond = responder
        }

        func add(item: TodoItem) {
            store.change(.add(.item(item)))
            respond(.wasAdded(item: item))
        }

        private let store: StateStore
        private let respond: ((Response) -> ())
    }
}
We can see that request(_ request: Request) now takes the concrete Request type, which is actually abbreviated here, as the real type is actually AddTodoItemUseCase.Request.
The same goes for the output callback that we pass in during creation. init(..., responder: @escaping ((Response) -> ())). This is a AddTodoItemUseCase.Response.
The AddTodoItemUseCase.Interactor class is where the real deal happens. As you’ll notice: The Interactor is private. This demonstrates that the UseCase resembles a real black box — which is beneficial for many things, first and fore-more unit testing, which I will comeback to later.
But as the UseCase is a blackbox and the Interactor private, you can actually drop it all together for very simple tasks. But for bigger tasks and asynchronous behaviour I strongly suggest using it as shown.
This is the corresponding deleting UseCase, without Interactor:
struct DeleteTodoItemUseCase: UseCase {
    enum Request  { case delete    (item: TodoItem) }
    enum Response { case wasDeleted(item: TodoItem) }

    init(store: StateStore, responder: @escaping ((Response) -> ())) {
        self.store = store
        self.respond = responder
    }

    func request(_ request: Request) {
        switch request {
        case .delete(item: let item):
            store.change(.remove(.item(item)))
            respond(.wasDeleted(item: item))
        }
    }

    typealias RequestType = Request
    typealias ResponseType = Response

    private let store: StateStore
    private let respond: ((Response) -> ())
}
A feature uses the UseCases like
let itemAdder = AddTodoItemUseCase(store: store, responder: handle(output: output))
//...
itemAdder.request( .add(item: item) )
with
private func handle(output: @escaping Output) -> (AddTodoItemUseCase.Response) -> () {
    return { response in
        switch response {
        case .wasAdded(item: let item): output(.todo(.response(.wasAdded(item))))
        }
    }
}
as callback. Here the todo feature informs all other features that an item was added output(.todo(.response(.wasAdded(item)))).
We will look deeper into features in one of the next articles.
Testing
As all our code is organised in small modules with one in - and maximum 1 output, and as these modules resemble real black boxes (not like in many architectures that depends on inheritance where it is rather some form of grey box), testing becomes dead simple: we do the only thing we can do — send requests to our modules and listen for the responses, or evaluating the state.
I use Quick & Nimble for testing. For these early examples it might look like overkill, but in later articles you will see an example which demonstrates its strengths.
We have an UseCase to tag and untag
struct TagTodoItemUseCase: UseCase {
    enum Request {
        case tag  (TodoItem, with: Tag)
        case untag(TodoItem, from: Tag)
    }
    enum Response {
        case wasTagged  (TodoItem, with: Tag)
        case wasUntagged(TodoItem, from: Tag)
    }

    init(store: StateStore, responder: @escaping ((Response) -> ())) {
        self.store = store
        self.respond = responder
    }

    func request(_ request: Request) {
        switch request {
        case .tag(let item, with: let tag):
            store.change(.replace(.tags(store.state().tags.filter { $0.id != tag.id } + [ tag.alter(.add(item)) ])))
            respond(.wasTagged(item, with: tag))

        case .untag(let item, from: let tag):
            store.change(.replace(.tags(store.state().tags.filter { $0.id != tag.id } + [ tag.alter(.remove(item)) ])))
            respond(.wasUntagged(item, from: tag))
        }
    }

    typealias RequestType = Request
    typealias ResponseType = Response

    private let store: StateStore
    private let respond: ((Response) -> ())
}
As we do not expect anything to go wrong, we have 2 requests and 2 responses.
So to fully test this UseCase we just need to write 2 tests — one for tagging, one for untagging.
import Quick
import Nimble

@testable import Todos

class TagTodoItemUseCaseSpec: QuickSpec {
    override func spec() {
        describe("TagTodoItemUseCase"){
            var itemTagger:TagTodoItemUseCase!
            var store: StateStore!
            var responses: [TagTodoItemUseCase.Response]!

            let storefile = "TagTodoItemUseCaseSpec.json"
            beforeEach {
                responses = []
                store = createStore(pathInDocuments: storefile)
                itemTagger = TagTodoItemUseCase(store: store){ responses.append($0) }
            }
            afterEach {
                itemTagger = nil
                store = nil
                responses = nil
                destroyStore(pathInDocuments: storefile)
            }

            let item = TodoItem(text: "Hey Ho")
            let tag = Tag(name: "Tag 1")

            beforeEach {
                store.change(.add(.item(item)))
                store.change(.add(.tag(tag)))
                itemTagger.request(.tag(item, with: tag))
            }
            context("tagging"){
                it("will add item's id to tag's list") { expect(store.state().tags.last?.tagged.last) == item.id }
            }
            context("untagging"){
                beforeEach { itemTagger.request(.untag(item, from: tag)) }
                it("will add item's id to tag's list") { expect(store.state().tags.last?.tagged) == [] }
            }
        }
    }
}
While much of this is boilerplate code, the interesting bit is
let item = TodoItem(text: "Hey Ho")
let tag = Tag(name: "Tag 1")
beforeEach {
    store.change(.add(.item(item)))
    store.change(.add(.tag(tag)))
    itemTagger.request(.tag(item, with: tag))
}
context("tagging"){
    it("will add item's id to tag's list") { expect(store.state().tags.last?.tagged.last) == item.id }
}
context("untagging"){
    beforeEach { itemTagger.request(.untag(item, from: tag)) }
    it("will add item's id to tag's list") { expect(store.state().tags.last?.tagged) == [] }
}
The it-closures are the real tests. Before any execution of an it-test, all previous beforeEach-closures are called, and after any it-execution every afterEach-closure is called.
That’s it. This UseCase is fully tested.
But I want to mention at this point: Not only are the UseCase tests so straight-forwarded, but in each level (appcore, features, usecases) the testing is very similar — as everything is a module.
This allows to do things like Behaviour Driven Development, which I will cover in a later article.
So to do TDD for UseCases, just create the UseCase skeleton with its requests and responses, but don’t implement anything else yet. Now create the test, which will compile but not succeed. Now implement the business logic. Refactor and repeat.
As we see: testing becomes simple and uniform. Test are written fast and executed quickly — TDD heaven.
Next…
In my next article I will cover the next of Core|UIs hierarchy, the Feature.